5/8/22 Update: I noticed that Meta(Facebook) is rolling out a revamped tool called Meta Business Suite that looks to replace Facebook Business Manager, which I reference in this blog. As a result, some locations of things I reference and directions I included below may not work anymore. I will try to update everything as soon as possible.
For musicians, a big part of marketing is accessibility. Whether it’s at a live show or on social media, you want to meet fans where they are at and make it as easy as possible to support you.
With Instagram being one of the top social media platforms for musicians, setting up the Instagram Shopping feature is a great way to do this. After launching in 2019, Instagram Shopping has become more widely available now for most business account users.
Unfortunately, the process to get set up can be a bit confusing. In this blog, I will go over all the steps in detail so you can get Instagram Shopping up and running on your Instagram account.
What is Instagram Shopping?
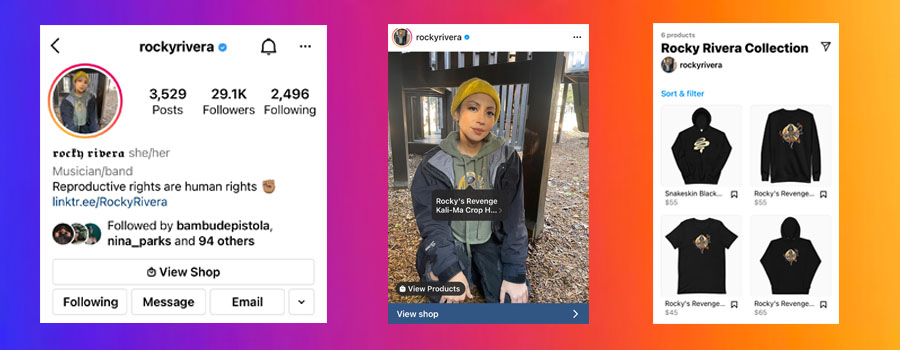
Instagram Shopping is a feature that allows you to create a shop page where fans can easily buy your physical products directly on Instagram. You can tag individual products in your newsfeed posts and stories so anyone who clicks it will be taken to a link to buy it. Activating this feature will also add a ‘View Shop’ button on your Instagram profile as well.
The process of getting this feature requires a bit of work and some patience.
Here is an overview of the individual steps:
- Check that you meet the requirements below.
- Make sure your eCommerce website already has products for sale and fans can make purchases there.
- Connect your Instagram account and Facebook Page to your Business Manager account.
- Verify the domain name for your eCommerce website in Business Manager under ‘Brand Safety’.
- Create a shop and catalog in Commerce Manager.
- Add products to your catalog in Commerce Manager.
- Customize the layout of your Instagram Shop.
- Add a collection with the products you added to your catalog.
- Publish your shop and wait for Facebook to approve your account.
Step 1: Check Requirements
Before getting started, you should check to see if you meet all the requirements to use Instagram Shopping.
– Is the Instagram Shopping feature available in your country? If you’re not in the U.S., click here to see a list to see if you can use Instagram Shopping.
– Do you have an eCommerce website on a platform like Squarespace or Shopify? You can only sell physical products on Instagram that are currently on your website. Additionally, you will need to verify your domain name to prove it is yours. This means you will need to have backend access to your website or know someone who can access it for you.
– Is your Instagram account type a Professional or Business account? If it’s personal, you would need to switch it to a Professional/Business account. Click here for instructions on how to switch.
– Does your eCommerce website comply with Facebook commerce policies? As long as you’re selling physical products (not digital or services) that are typical merch items from your website, you should be fine. Otherwise, you may not get approved during the review process. Read their commerce policies here.
– Does your brand demonstrate trustworthiness? Facebook just says you need an authentic, established presence that may also include maintaining a sufficient follower base. They don’t get into any details, but assuming you’re not a new artist with a brand new account, you should be okay. Otherwise, you may need to be active and age your account.
If you check all the boxes above, then you should be ready for the next steps.
Step 2: Setup Your Facebook Business Manager
To get things started, you need to gain access to your Business Manager account.
What is Business Manager?
Chances are you have a Facebook Business page as an artist. For example, like this. That Facebook page is managed by an umbrella/overhead account called Business Manager.
Facebook Business Manager is a tool to manage and organize all of your Facebook business-related assets in one place. Think of it as a master account that oversees your Facebook page, Instagram account, Ads Manager, etc. It allows you to grant your team members or collaborators access to your individual business assets.
It can get a little confusing because there are 3 other “manager” accounts under the umbrella of Business Manager – Ads Manager, Events Manager and Commerce Manager. The only two we’ll be working with in this guide are Business Manager and Commerce Manager.
Technically, everyone who has a Business Facebook Page should have a Business Manager account even if you’ve never used it. If for some reason you don’t have it, you can follow these directions to create it.
For this step, there are two important actions you need to take in Business Manager.
- Connect Your Facebook Page and Instagram account to your Business Manager account
- Verify the domain name of your eCommerce website
1. How to connect your Facebook Page and Instagram account to Business Manager
First, you’ll need to link/connect your Facebook Page and Instagram account to your Business Manager account.
From the Business Manager home screen, go to ‘Business Settings’ by clicking the gear icon on the bottom left corner.

Business Manager Home Screen
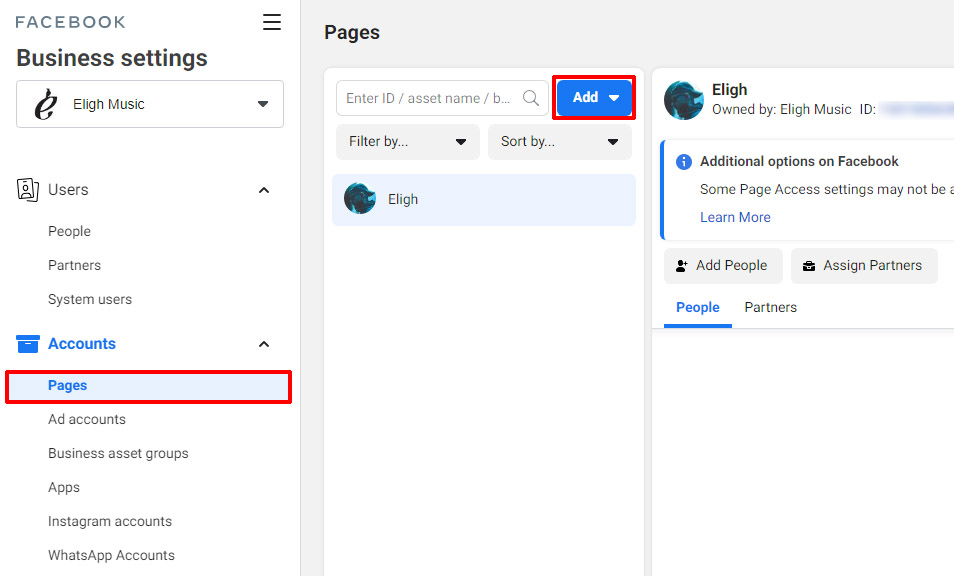
On the left side menu in Business Manager Settings, you will see ‘Pages’ and ‘Instagram Accounts’ under the ‘Accounts’ tab.
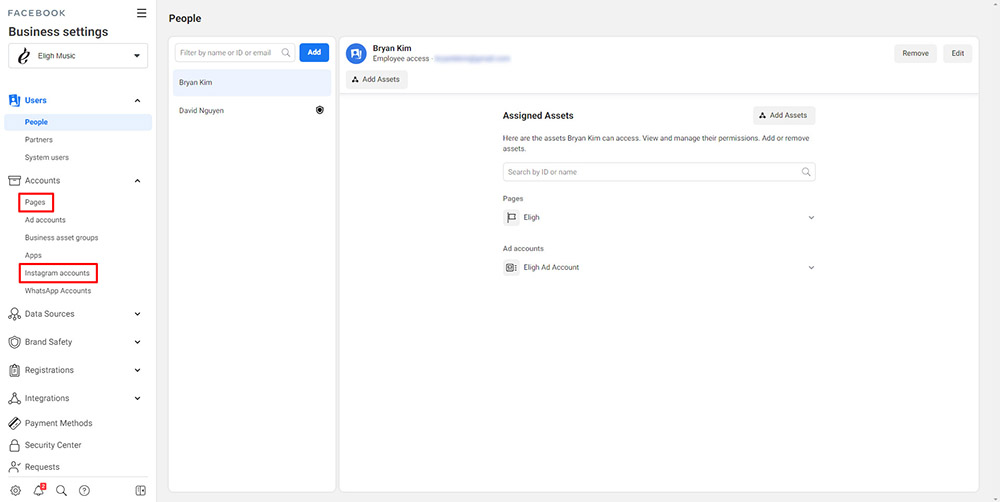
To connect your Facebook page, click on ‘Pages’ and then the blue ‘Add’ button. Select ‘Add a Page’ then type the name. You can only add a page if you’re currently an admin for that page.
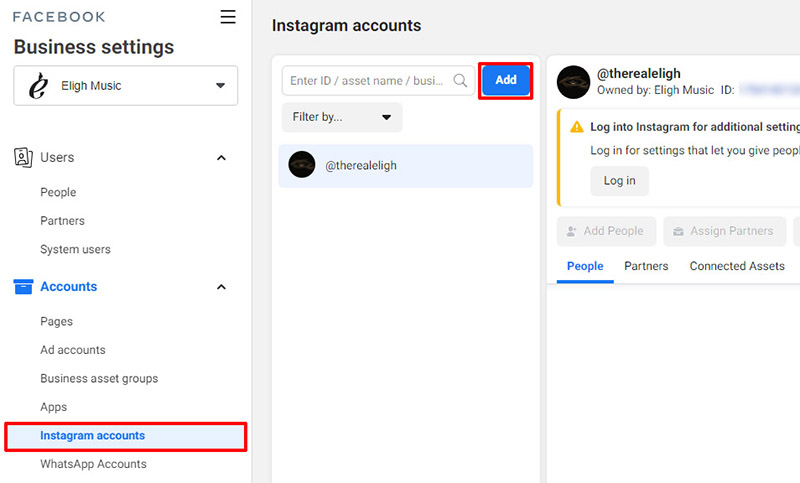
Next, to connect your Instagram account, click on ‘Instagram Accounts’ then the blue ‘Add’ button. Hit ‘Connect your Instagram Account’ and you’ll be asked to log in. If you’re successfully, your Instagram account user name should be listed.
2. How to verify your domain name in Business Manager account
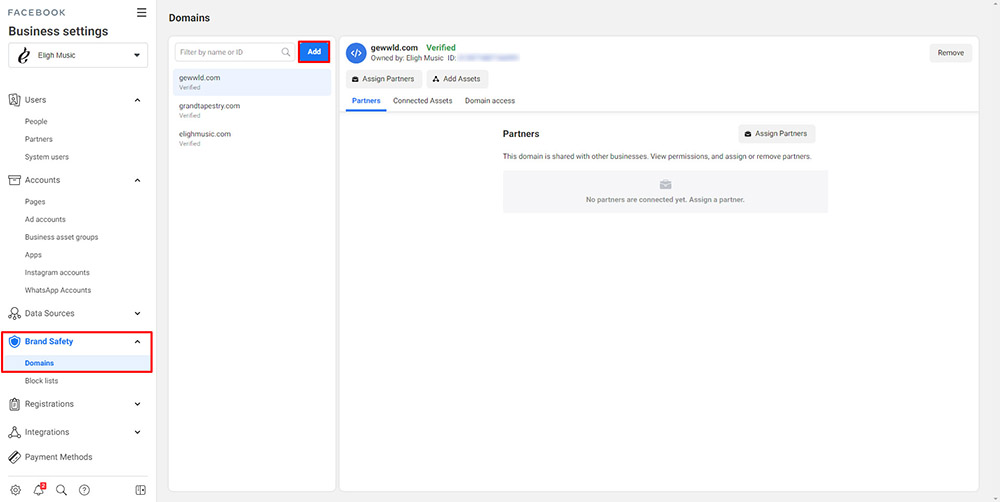
Second, you want to verify the domain name of your eCommerce website. To do this, go to the ‘Brand Safety’ tab on the left side. Click on ‘Domains’ then the blue ‘Add’ button to get started. Type in the domain name of your website and hit ‘Add’ again. You’ll be prompted with the next step.
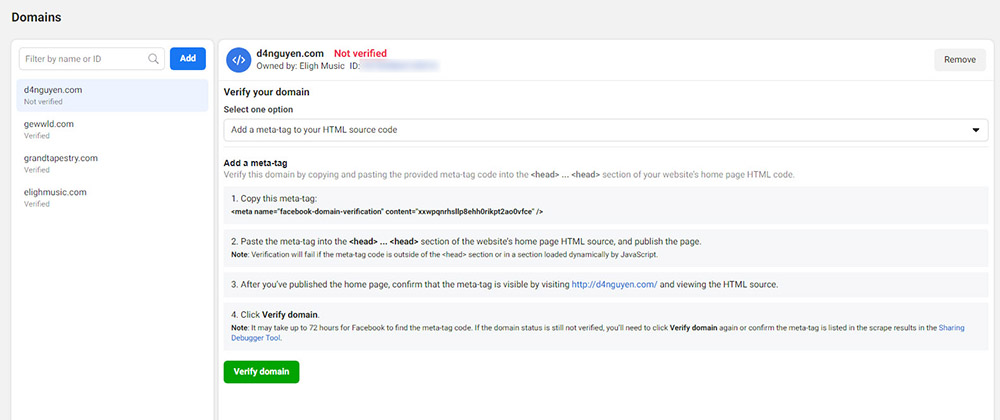
The main action you will need to do is add a specific line of code (meta-tag) inside of your header tags for your website. This is the most “technical” part of the process, but it should be fairly easy depending on what website platform you use. If you paid someone to create and/or manage your website, they should be able to do this step for you easily. Otherwise, you can do it yourself with some direction.
If you have a Squarespace or Shopify website, see instructions below. For any other website eCommerce platform, you’ll just have to search Google or YouTube on how to add code to header tags for your respective platform.
Once you add Facebook’s meta-tag to your website, you’ll hit ‘Verify Domain’ back in Business Manager. If you did this correctly, it will show green verified text next to your domain name.
Squarespace Websites
For Squarespace eCommerce websites, log into the backend of your website. From the home screen, go to ‘Settings’ -> ‘Advanced’ -> ‘Code Injection’. On the top, you should see ‘Header’. Copy and paste that domain verification code in this section and save.
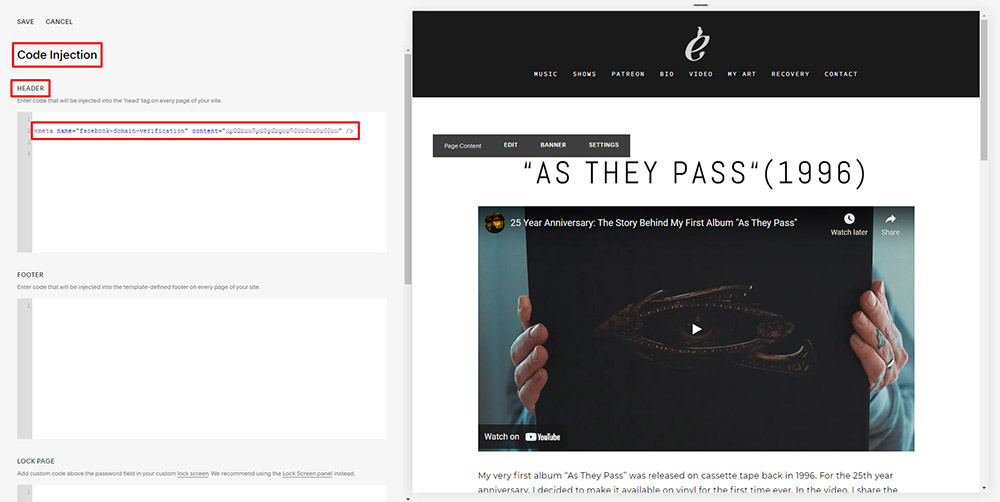
Where to add the meta-tag for Squarespace websites
Shopify Websites
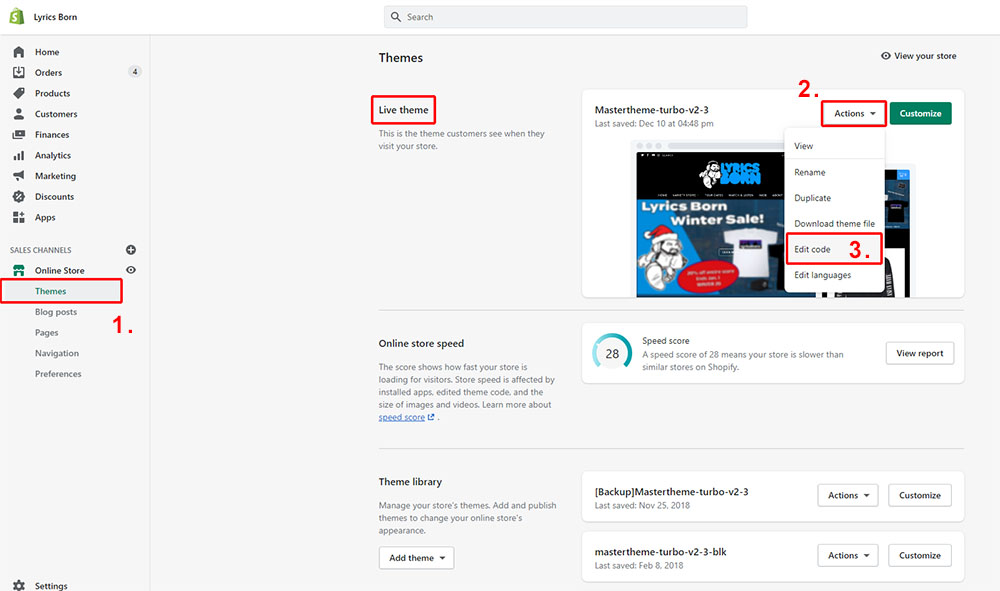
For Squarespace eCommerce websites, log into the backend of your website, which should be: https://yourdomainname.myshopify.com/admin/ (replace yourdomainname with your website). From the home screen, click on ‘Online Store’ on the left hand side. It should drop down a menu so click on ‘Themes’ on top. For ‘Live Theme’, click on ‘Actions’ then ‘Edit code’.
On the next page, you should see a folder called ‘Layout’. Select the file ‘theme.liquid’. Locate the header tags as pictured above. You’ll paste the domain verification code from Business Manger between these 2 tags. Make sure you’re not pasting it between another block of code.
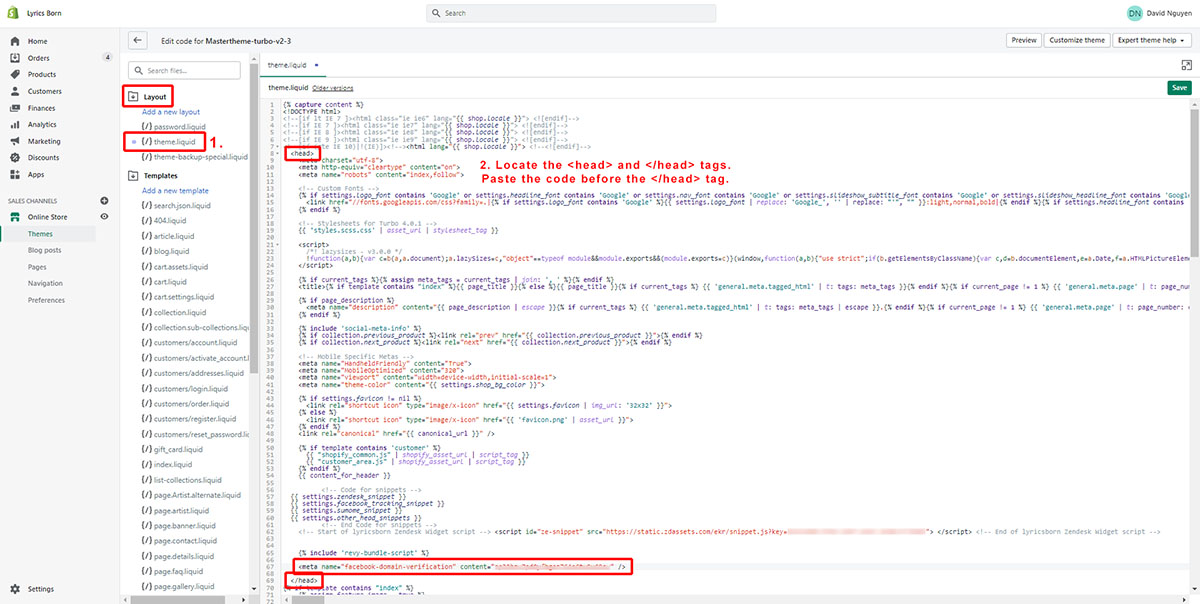
Once you add the code, hit the green ‘save’ button and you’re all set to verify the domain back in Business Manager.
Step 3: Create a new catalog and shop in Commerce Manager
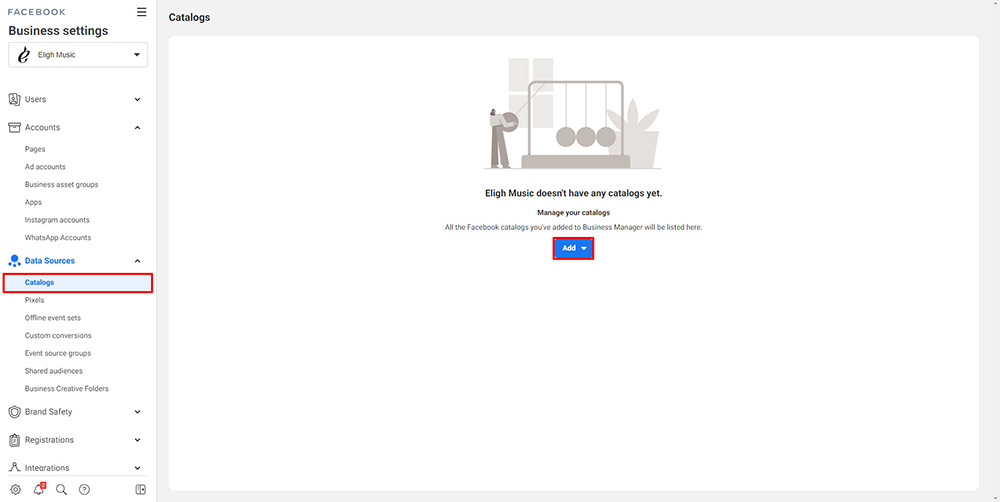
Once you’ve added your Facebook and Instagram accounts to Business Manager and verified your domain name, the next step is to create your storefront and catalog. This done through the Commerce Manager. A catalog is essentially a database or spreadsheet of different products you want to sell through your Instagram Shop.
Once you’re in the Commerce Manager home screen, you’re going to click ‘Add Shop’. Select ‘Instagram’ and hit ‘Next’ where you’ll see the following page:
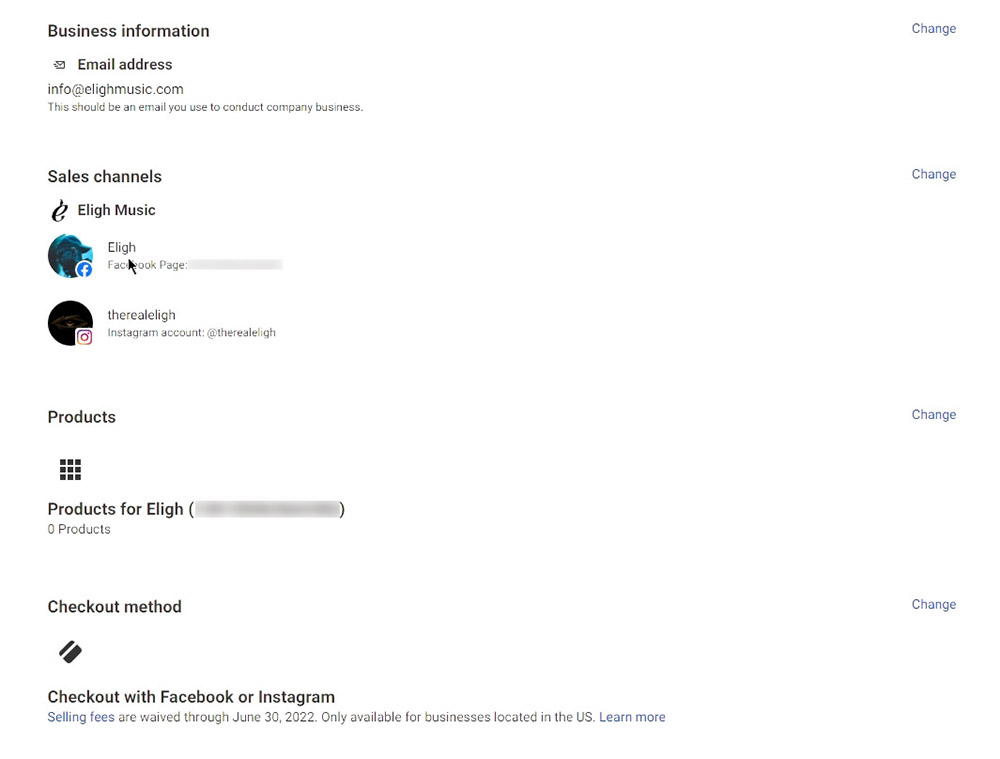
‘Business Information’: Use an email address that you use for customer service or general inquiries with the public.
‘Sales Channel’: Make sure your Instagram account is displayed.
‘Products’ Catalog: They automatically generate a catalog name for you. You can change it to something more specific like “Merch”. Facebook recommends only creating one catalog for your account.
‘Checkout Method’: There are two options. You can either have customers check out on your website or on Instagram itself.
Checking out on your website is the easiest and quickest option to set up, which is what I recommend, but it’s not the seamless experience you ideally want. Being able to check out on Instagram is very convenient for fans because you can make purchases right inside the Instagram app. However, there are requirements you have to meet in order to activate this feature. One of them being you have to be based in the U.S. There are also fees involved when checking out on Instagram. To see what you need in order to checkout on Instagram, you can refer to this page.
On the next screen, select the countries or regions you ship to.
Type in the domain name of your eCommerce website. The reason why we verified the domain first is because you can only input a domain here that was verified in your Business Manager account.
Lastly, check the box that says you agree to their Seller Agreement and click ‘Finish Setup’.
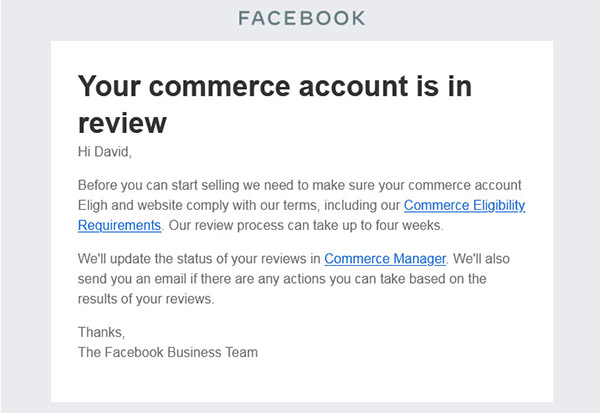
Once you create your store front and catalog, you will receive an email saying your commerce account and website will be under review. They say this process can take up to 4 weeks.
In the meantime, you can go ahead to the next step and add products to your catalog.
Step 4: Add products to your catalog
In the previous step, we created a new shop and a catalog where we can load products you intend to sell on Instagram. Now we’ll go ahead and add each individual item in the catalog.
To get started, go to your Commerce Manager page. Click ‘Add Items’ from the Overview screen and it will ask for your preferred method:
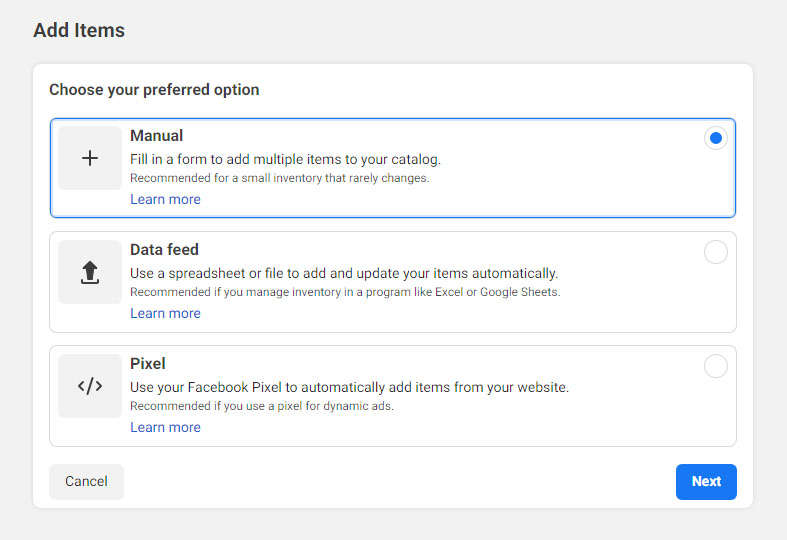
There are four general ways to add products to your catalog: Manual, Data Feed, Partner Platform and Pixel.
I’ll only touch on the main two. You can add them manually one-by-one or through a Partner Platform where you connect your eCommerce platform to your Facebook Business manager account. This allows you to automatically import and sync products to your Instagram Shop.
Please Note: You need to make sure anything you add to the catalog is already active on your website. You are only allowed to sell physical products in your Instagram Shop that are already available on your own website.
The big platforms that have this partner platform integration are Shopify and WooCommerce, but you can check this list to see if your platform is supported. Because the eCommerce website we are using is Squarespace, it does not give us the Partner Platform option so we will do manual.
Instagram recommends adding at least 4 items for better customization of your store front.

For each item, you’ll need the following:
- A photo (ideally a square one)
- A short description
- URL link to the product on your website
- Price
Once you added all the details for your products on each line, hit ‘Upload’ to finish this step.
Down the line, if you ever need to go back to add and remove products, just go to your Commerce Manager and edit your catalog.
Step 5: Customize the store front
Once you add products to your catalog, the last step is to customize your Instagram store front. This is only optional, but you should still check it out and see if you might want to make any adjustments to how your stop will look to your fans.
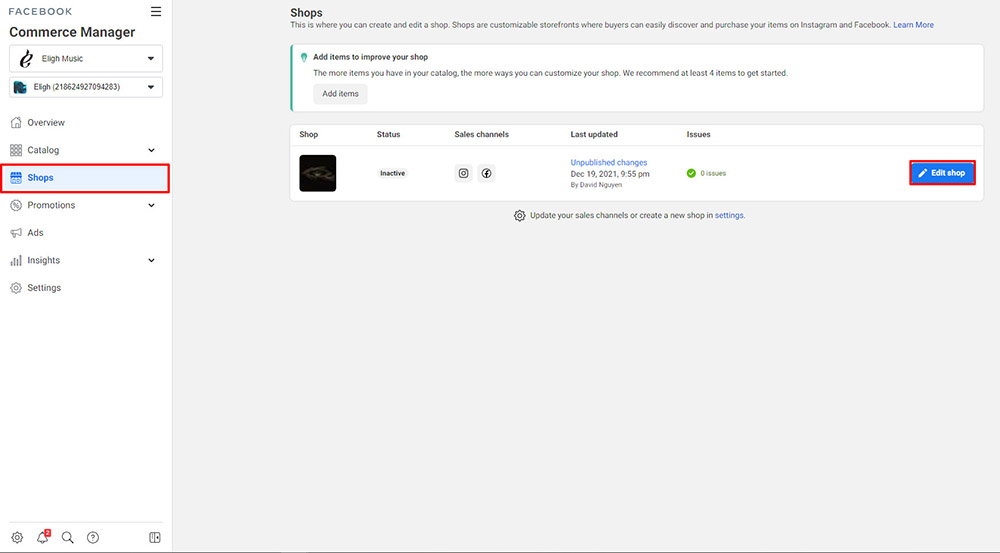
To get started, go to the ‘Shops’ tab in the Commerce Manager. On this screen, you’ll see the status of your shop. If you’ve been approved and your shop is published, it’ll say “active” under ‘Status’. In the meantime, you can hit ‘Edit Shop’ to customize your Instagram shop page.
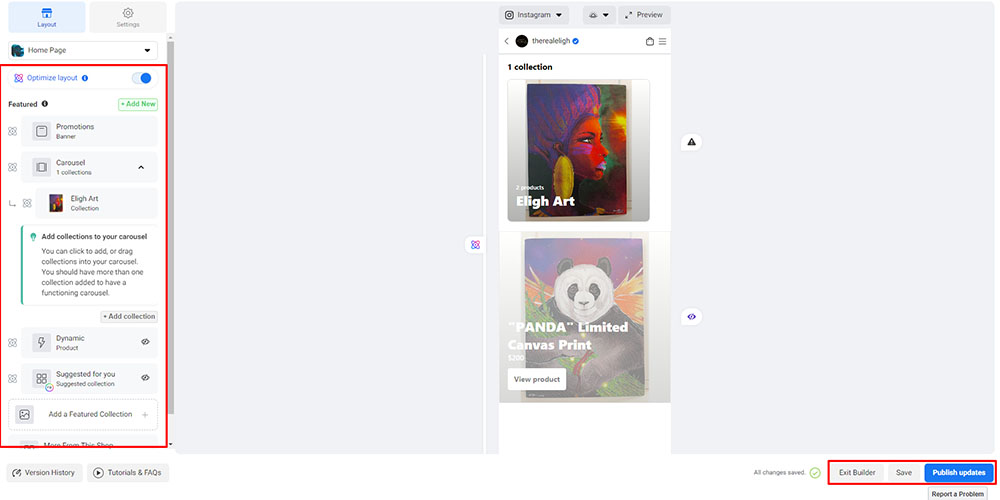
On the left hand side, you can customize and organize the layout of your shop based on the different element types (Promotion Banner, Dynamic Product, Carousel, Suggested for You…”. By default, Instagram will turn on the optimize layout option for you so you won’t be able to move any of the elements. In my opinion, you really don’t need this setting on as it rearranges the products and collections uniquely to the user based on their interests and past behaviors on the app.
Click the ‘optimize layout’ switch once to disable so you can move the elements up or down by dragging the 6-dots on the left side. I also think you don’t need most of these elements either so you can hide them by clicking the eye icon on the right side. You can click on each one to see what it does.
The main step you might want to do here for your store front is ‘Add collection’ to group certain products together in your Instagram shop. It’s not necessary but it’s a good way to keep your shop looking organized.
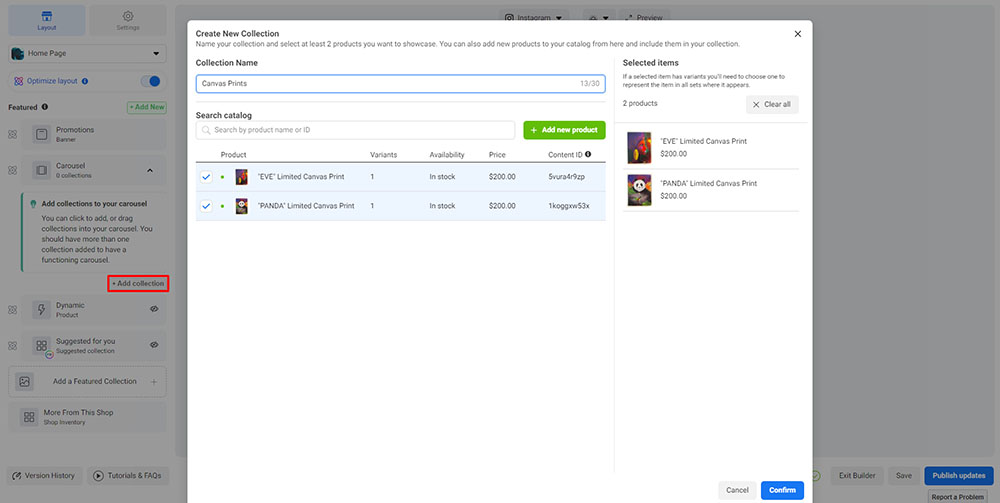
Under the carousel element, click on the button that says ‘add collection.’ All you need to do is name the collection (maybe you have merch tied to a specific release) and select the individual products in your catalog that you want to include in this collection. When you’re done, just hit ‘confirm’.
You can always go back and tweak it how you want after you’ve been approved and your shop is live.
Since you won’t be able to publish the shop here so once you’re done, just hit ‘Save’ and ‘Exit Builder’.
Step 6: Wait for approval then publish your shop
In order for your Instagram Shop to go live, it needs to pass 3 reviews:

The review process was first triggered when you created the shop and catalog. They say it can take up to 4 weeks, but it only took a few days for me. If everything goes to plan, you should receive the following email that says you’re ready to start selling:
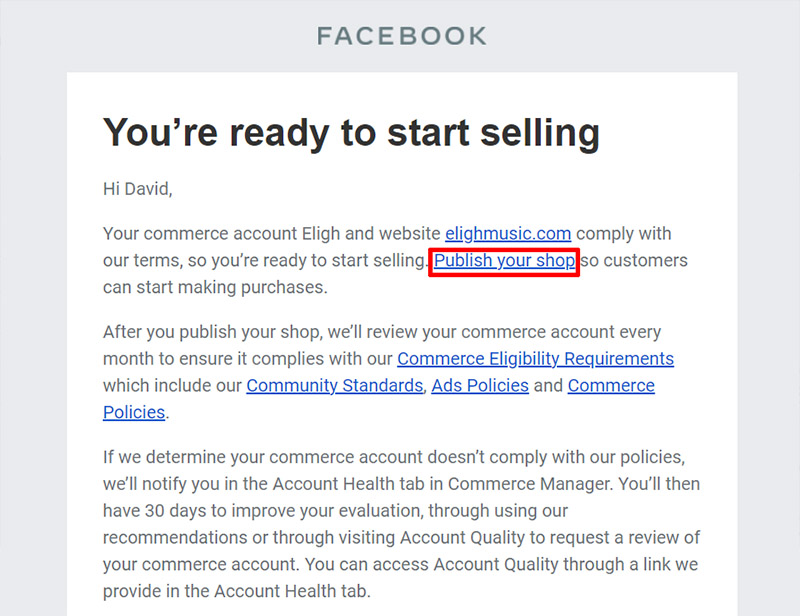
The final step is to publish your shop. You can either click on the link in the email where it says “publish your shop” or you can just go directly to your Commerce Manager to do it there. Publishing your shop will trigger one last review (technically the forth one), but should only take a few minutes.
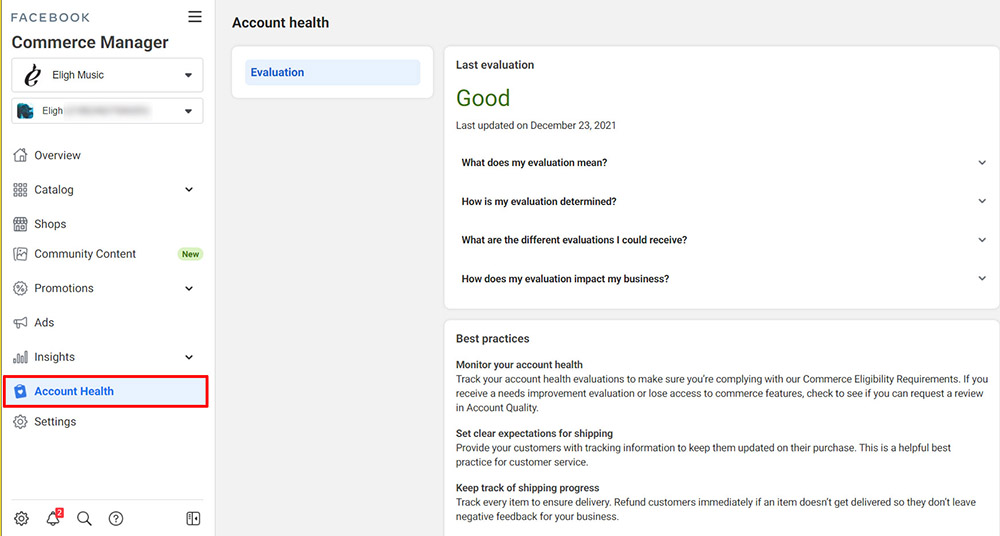
Keep in mind that your Instagram shop is something that they will evaluate every month to make sure everything is in compliance to their policies. They recently added a new tab called ‘Account Health’ in Commerce Manager to see your current standing.
With all out of that out of the way, you’re ready to use Instagram Shopping!
Step 7: Promote your Instagram Shop and products
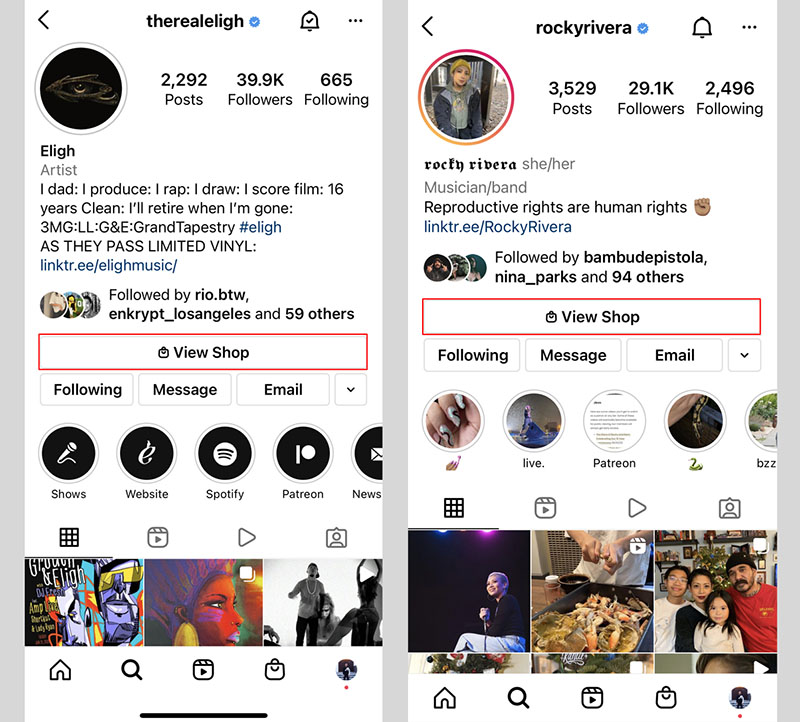
Once you’ve been approved, the ‘Shop’ button will be live on your Instagram profile and you can start tagging individual products in your newsfeed posts and stories.
How to Tag Products in Your Newsfeed Posts
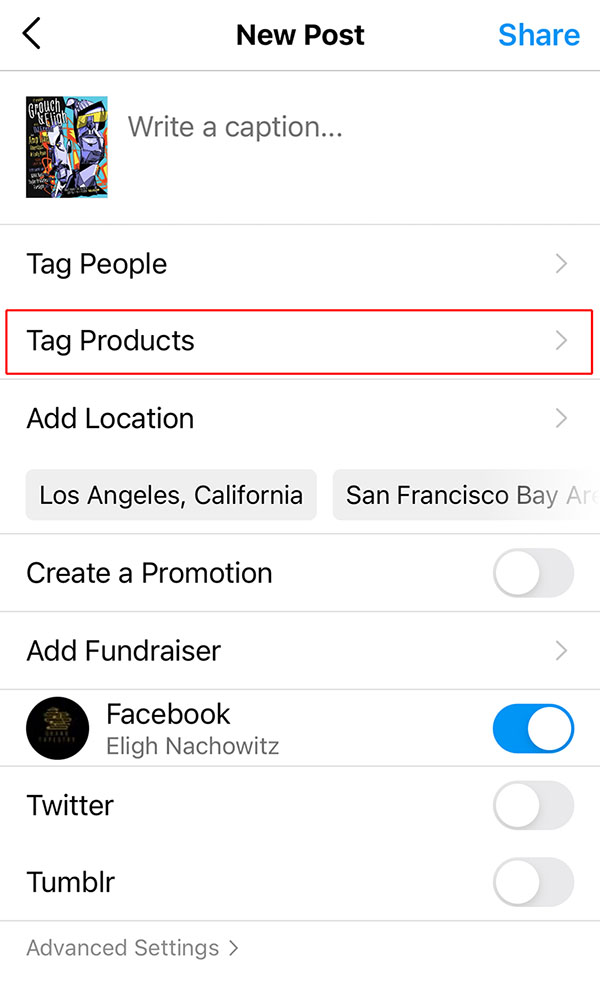
On the last screen before you share your post, you should see an option below where you write the caption that says ‘Tag Products’. Simply tap where you want to add the tag on your photo and select the shop source that contains the products you want to tag. You can tag multiple products in a single post, but as a best practice, only tag the products that are actually in the photo.
For a single image post, you can tag up to 5 products or a total of 20 products in multiple images inside a carousel-style post.
For videos over 20 seconds, you can tag individual products or collections by pinning them to specific parts of videos.
You can also go back and edit previous posts to add product tags.
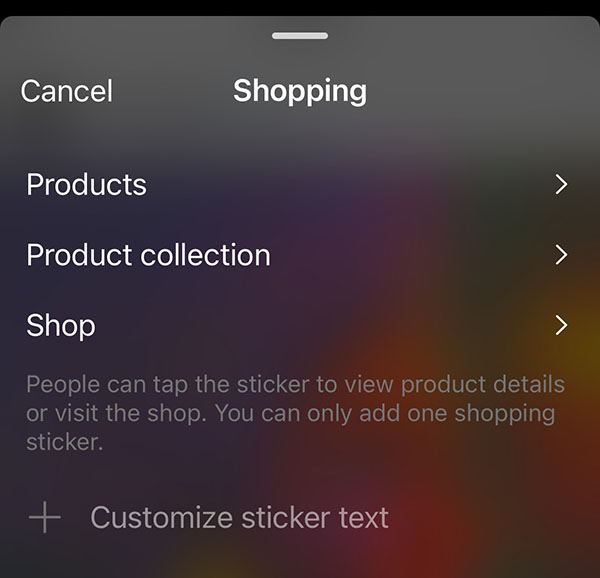
How to Tag Products in Your Stories
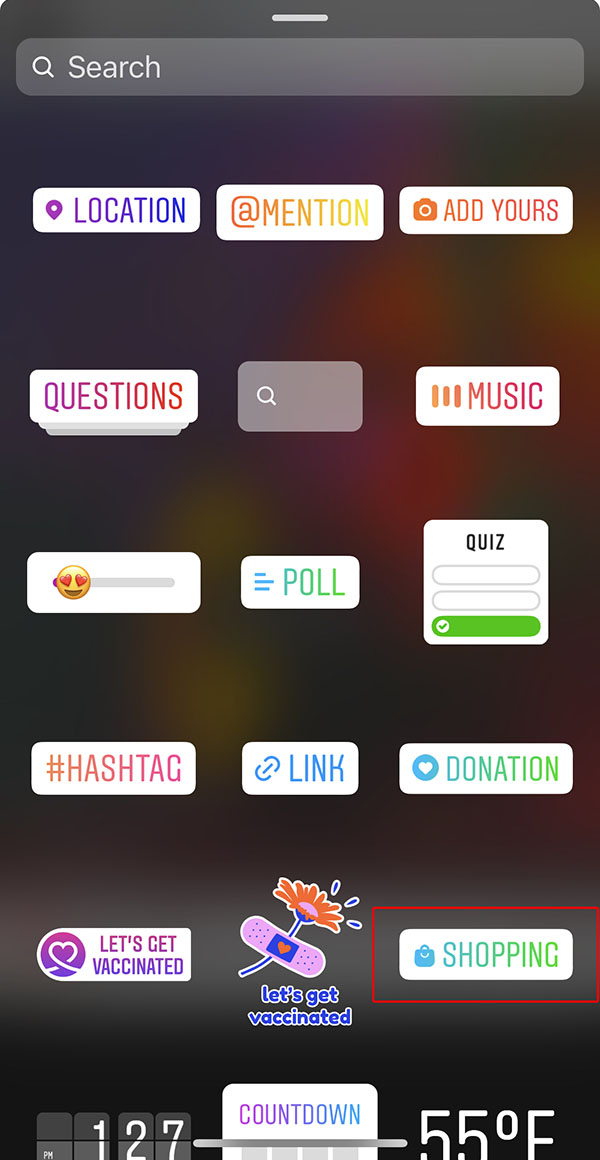
You can find shopping tags in the Sticker tab where you edit your Story. There are 3 sticker options that you can link: Individual products, collection and the entire shop.
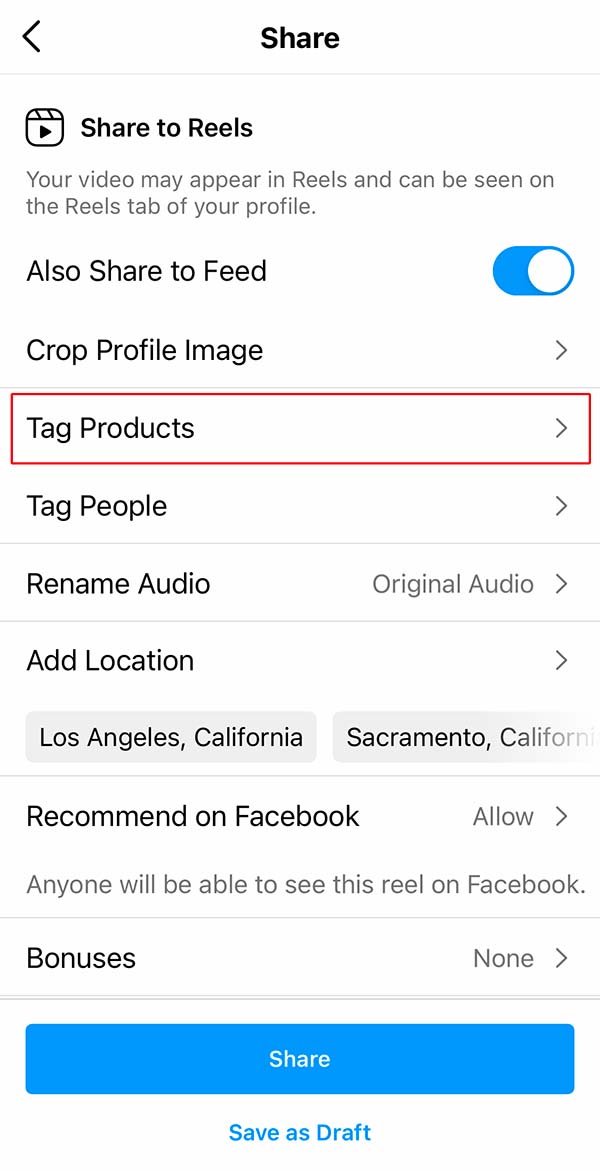
How to Tag Products in Reels
Similarly to your standard newsfeed posts, you can tag products and collections towards the end screen after recording your Reels video.