
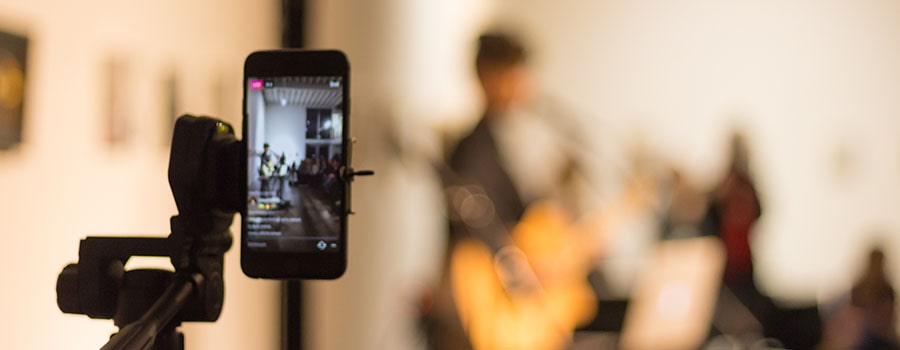
Video content is essential for any independent artist looking to gain exposure, build a fanbase and ultimately work your way into a full-time music career. The problem is not every musician has the budget to hire a videographer for every song you do, especially when money is tight.
In this blog, I will go over how you can record your own videos without the need of any fancy cameras and minimal investments in equipment. All done simply through your mobile phone. Yes, you can still produce good quality video content with it. (Example of a ” target=”_blank”>viral video I shot with my iPhone 16 Pro). This guide is perfect if you’re new to video or you just want tips to make improve the video quality of your content.
I’ll specifically focus on cover song videos since it’s a very common and viable type of video content artists will release.
Using cover songs as a strategy to blow up isn’t as powerful as it used to be in the earlier days of YouTube just because of all the competition now. However, this doesn’t mean a good cover video can’t be effective to engage fans and earn new fans.
Whether or not you decide to do covers of other songs, at the very least this blog will still be useful for covering video basics you should know and essential equipment you should have.
Please Note: This blog contains affiliate links to Amazon, meaning that I get a small commission when you purchase any of the items I recommend. This is a great way to support the work that I do at no extra cost to you. Read my full affiliate link disclosure here.
1. Planning & Preparation
It’s always smart to take a step back to do some planning before hitting record. Here are some things to think about when you’re preparing.
Decide On a Song
The song you choose may influence your other decisions on where and how to shoot the video so you’ll want to figure this out first. Start with your favorite songs since you’ll likely be more familiar with the lyrics.
For more strategic purposes, you may want to do new, popular songs or songs that are trending since people are more likely to search for them and can stumble on your cover version of it. To get a pulse on what’s trending, you can use TikTok, Twitter, YouTube Charts or Google Trends.
Another strategy is to cover a song in a different style or genre to create something more unique. This has to be done tastefully because if something is off about it, you’ll go viral for the wrong reasons.
For some inspiration, check out one of the original cover song YouTubers Kina Grannis. Despite having over 1 million subscribers, she still puts cover songs consistently along with her originals for over 10 years now.
Lip Sync vs. Live Performance?
There’s two general ways you can record a cover video. You can either record yourself performing the song live or you can record the audio beforehand while you lip sync in the video. To keep it more simple and less work later, you’ll want to do the first option. This means you’ll also want to rehearse as much as possible before recording so there’s minimal takes.
Doing the lip sync version can be a bit more advanced and will require some post-production video work so I won’t get in depth in this guide. Unless of course, you play the cover song on speakers and record yourself live lip syncing, but that’s not going to provide the best results.
Where to Shoot
Indoors
Typically, you’re going to want to shoot indoors because it’s easier to control your surroundings. Find a spot in your space that you can tidy up. This could be a home studio, a nice space in the living room or even your bedroom. Just make sure it’s clean and not distracting.
Here’s an example by Butterscotch covering a song by Prince live on video in her room:
One important thing to consider if you’re recording live audio with your video is the acoustics of the room you’re in. Because sound bounces off walls, floors, ceilings and windows, you want to control those things to get the cleanest audio possible and eliminate echoes. If you have a home studio already, it makes sense to record there since you should have it soundproofed.
For starters, add rugs on non-carpeted floors and hang blankets on bare walls. I’m not an expert in this field, but check out some home tips on improving room acoustics. You can easily look up “room acoustic basics” on YouTube to learn more about the science behind it and even tutorials.
Outdoors
Shooting outside can be a great option, especially if you want a more appealing visual backdrop. It can even as simple as your backyard:
If you want to spend a bit of money, you can rent an Airbnb home with a nice backyard view.
There are a few things to consider when shooting outside:
- You’ll have to account for any random noise from street traffic, airplanes, nearby construction and animals. If you’re going to pre-record the cover song and lip sync in the video, consider adding some subtle outdoor sounds in post-production that make sense in the video to make it more realistic.
- The sun is a very powerful source of light so you have to be more careful when you shoot, which is covered in the next section.
- Shooting in certain public places for commercial purposes (which include cover song videos) might require a permit. For example, if you decide to shoot somewhere with a cool scenic background at a national park, you may need to pay for a permit to shoot. You can get kicked out or even fined for doing it without getting permission. Do some research beforehand by searching “(name of the place) + video permit“. Some places will allow low-impact filming for commercial purposes with a couple people as long as it’s not disruptive to other visitors.
Outdoor Example: Here’s a cover song video I recorded for my friends AstraLogik at a local park. They prerecorded the song before hand and played it in their ear piece as I recorded them lip syncing / playing along on the guitar. We recorded ambient sounds nearby and layered into the song later to help make it sound realistic. There was a slight overcast when we started recording, but as it got towards the end of the song, it gets brighter as the clouds moved away. The funny thing is it matches the lyrics she’s singing about how “there will be a brighter day,” which was totally coincidental.
Lighting
Having good lighting is crucial for a good video. You don’t want videos that’s too dark where people can’t see you and there’s a lot of noise/pixels. You also don’t want anything too bright where the video is blown out or you’re squinting from the bright sun.
For indoor lighting, you’ll want to consider setting up close to a window to get some natural light if shooting during the day.
If you’re shooting at night, you’ll likely need some extra light sources. This could be as simple as a room lamp with a shade over it to go with your ring light.
The placement of light sources, the type and color tint are all factors to help you get the best quality out of your videos, but it can be more technical. To keep things simple in this guide, I’ll touch on this in the advanced section of the blog.
If you do decide to shoot outdoors, you really have to be cautious about lighting, especially with the sun. The sun is a very strong and harsh source of light. Ideally, you’d want the sun to face you but it probably won’t look good if it’s making you squint the whole time. If you have the sun behind you, your face won’t be lit up. It can create a silhouette look that could be a look you’re going for.
If there’s an overcast or a cloudy day, this helps to diffuse the light and makes for a great time to record. Otherwise, it’s best to avoid shooting hours around noon or when the sun is at the highest peak. Times that are closer to sunrise or sunset (golden hour) are more ideal.
2. Equipment
There are some basic items you’ll need to help make shooting video much easier by yourself. You shouldn’t have to spend more than $100, assuming you already have a smartphone or iPad.
Smartphone:
You’ll want the most updated version whether it’s an iPhone, Samsung Galaxy or Google Pixel. For an iPhone, you’ll want at least an iPhone 12, but having one of the newer models, like an iPhone 16 Pro, would be more than sufficient.
If you wanted to invest in a separate camera, I would recommend the DJI Osmo Pocket 3. I don’t have one personally, but I have a videographer friend that uses it for the artists he shoots. Looks surprisingly great for it’s size and performs well even in low light. I would definitely consider getting one for myself.
Tripod:
To shoot video by yourself, a tripod is essential. Because you’re using it with your iPhone, you don’t need a heavy-duty tripod. Here are some great options at affordable prices:
I recommend the Amazon Basics 60-inch lightweight tripod, which will run you about $30 dollars. This is something I used to have before I upgraded my DSLR.
You could also go with the Amazon Basics 16.5 – 50-inch lightweight tripod, which is smaller and costs almost half the price. Just be aware that these cheaper tripods are not ideal very expensive, heavier professional cameras, but are perfect for your phone camera.
Another great option is the Fugetek 51-inch tripod, which costs around $25. For its size, it’s ideal for smartphones. It also includes a phone mount so you don’t need to buy it separately.
Lastly, for something a little more sturdy, try the UBeesize 67-inch camera tripod for $38. This is more ideal if you want something that can be used for other heavier devices and not just smartphones. This also comes with a rotating phone mount.
Flexible Tripod:
In some cases, your traditional tripod may not work for you because of the lack of space. A flexible tripod is great for putting on a desk or table to record. Because the legs are flexible, you can manipulate it to sit how you want.
The brand I personally use is the Joby GorillaPod, which will run you around $45. This model is made for heavier cameras like DSLRs, but of course, it can be used for smartphones.
If you don’t use it with a DSLR, you can get the Joby GripTight ONE GorillaPod ($35) or the Joby GripTight Smartphone/Action Camera Flexible Tripod ($50). Both come with a phone mount.
Phone Mount/Adapter for Tripod:
Some tripods don’t come with a phone mount so you’ll need to buy one separately. There’s a bunch to choose from, but you just want to make sure it fits for your smartphone and it can rotate to your needs.
Vastar Smartphone Tripod Adapter ($8) will fit most smartphones and will rotate to shoot vertically or horizontally. You can also go with the Jansite phone tripod mount with remote 360 rotation for $10.
If you don’t mind paying up for a reputable brand, I recommend the Ulanzi ST-02S aluminum phone mount for $18. The best part is it has a cold shoe mount, which is a slot that allows you to attach an external microphone to connect to your iPhone for higher audio recording.
Lighting
Ring lights are very popular for recording and live streaming video on a smartphone. They often come with a tripod and phone adapter so you don’t need to buy them separately.
For $36, the UBeesize 10-inch LED Ring Light with tripod stand and phone holder is a great start. For something more compact that can be placed on a desk or table, I would go with the UBeesize 10-inch LED Ring Light with stand and phone holder for $25.
If it is in your budget, I would recommend using at least 2 light sources (a key light and a fill light). Your secondary source of light can be a softbox or a reflector.
The light reflector I have is a Neewer 43 Inch 5-in-1 Collapsible Multi-Disc Light Reflector. This can also be useful outside to reflect direct light from the sun to your subject. For those not familiar with a reflector, you can see how it’s being used in this video clip.
External Microphone (Optional):
The audio captured from your smartphone mic, especially the newer models, can be sufficient. However, if you want audio quality that’s a step up, you should consider connecting an external microphone.
The external mic I personally use for my DSLR is the Rode VideoMicro Compact On-Camera Microphone ($50), which is very popular model and brand. I was previously using the Comica CVM-VM10II Professional Cardioid Video Microphone, which did a decent job for the price ($32 – $36).
You can also consider the Moukey Universal Video Microphone ($30) or the Movo VXR10 Universal Video Microphone ($50).
To use an external mic, you will need an adapter from the mic (3.5 mm jack) to your specific smartphone because the 3 mics above do not include one. For iPhones, get the Apple Lightning to 3.5 mm Headphone Jack Adapter.
You will also need a place for the external mic to sit when connected to your phone. The Ulanzi ST-02S aluminum phone mount has a cold shoe slot for an external mic and it will fit on any tripod.
Gimbal / Phone Stabilizer (Optional):
If you want to move away from doing fixed shots with your smartphone, you may want consider incorporating some camera movements in your footage. Although not necessary, having a gimbal for your smartphone is a useful tool to level up your videos if you have someone helping you film. For those who are not familiar, a gimbal is device that helps to physically stabilize your smartphone and keep it balanced to give you smooth footage. This is a good investment to have if you plan to do other types of videos outside or want to incorporate movement.
A popular brand and model for gimbals is the DJI Osmo Mobile 6.
What I personally use and have is the Zhiyun Smooth 4 Gimbal Stabilizer. It works great for me because I have an iPhone 12 mini but you’ll need to see what type of phone the gimbal supports before you purchase. There’s a newer model available as well.
3. Camera Settings
Once you have all the preparation done, it’s almost time to start recording. Before starting, you’ll want to tweak some settings. As an iPhone user myself, I can only explain it for that device. Go to your ‘Settings’ app, and scroll down to ‘Camera’.

Resolution: This refers to how big the video size is. The most common resolution is HD (High Definition) at 1920 x 1080 pixels. There’s also 4K which is double the size of HD for higher quality, which also means it takes up more storage space and requires more processing power.
Frames Rates or FPS (Frames Per Second): FPS refers to how many still images does your camera capture in one second. The 3 typical FPS settings are 24, 30 and 60. A higher FPS makes the video more smoother for a lifelike/realistic look. 24 FPS gives it more of a cinematic feel you would see in movies or music videos, which is what you want for your cover song video.
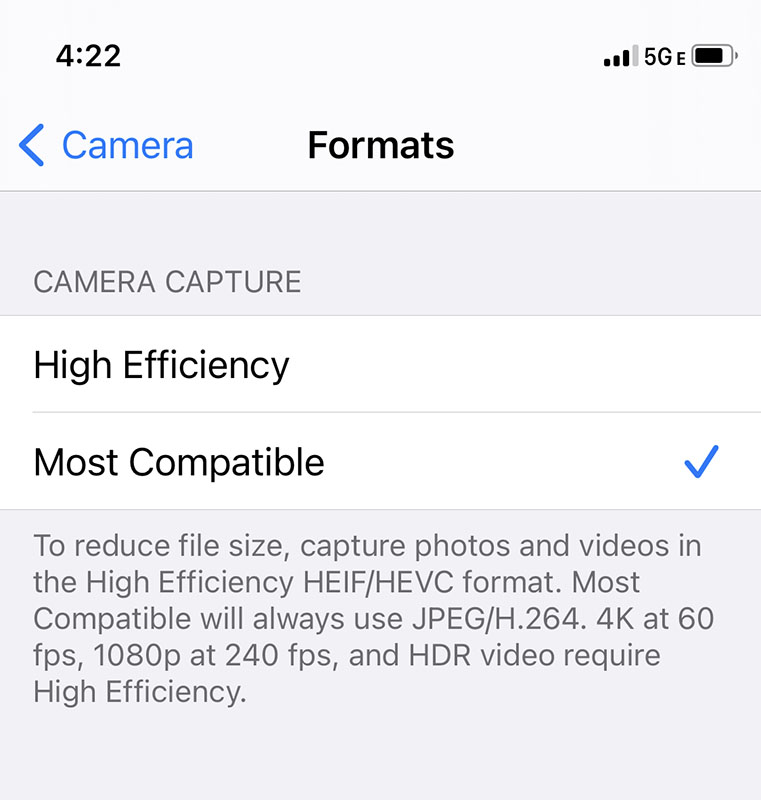
Formats/Camera Capture: Not to get technical, but this just refers to the file format of the video. ‘High Efficiency’ allows file sizes to be smaller so you can store more videos on your phone, but it can be tricky to work with if you use video editing software like Adobe Premiere. ‘Most Compatible’ results in bigger video sizes but it can work easier in different apps. If you’re just going to keep the cover video simple and edit on your phone, you can use ‘High Efficiency’. But I prefer to go with ‘Most Compatible’ over ‘High Efficiency’.
What should you use? The ideal setting you’ll want to shoot is either 1080p (HD) or 4K at 24 FPS. For iPhones, you can only shoot 24 FPS at 4K so go with that.
![]()
Another alternative is to shoot 60 FPS at 1080p and convert it to 24 FPS in a video editing software like Adobe Premiere or Final Cut Pro. This requires more advanced knowledge, so for simplicity sake, just shoot 4K at 24 FPS.
Just keep in mind that for platforms like YouTube and Facebook, 4K is ideal because the resolution will adapt to the viewer’s preference or internet connection speed. If you’re posting to Instagram, you’ll only need 1920 x 1080p because it doesn’t support 4K.
4. Setting Up the Shot / Recording Video
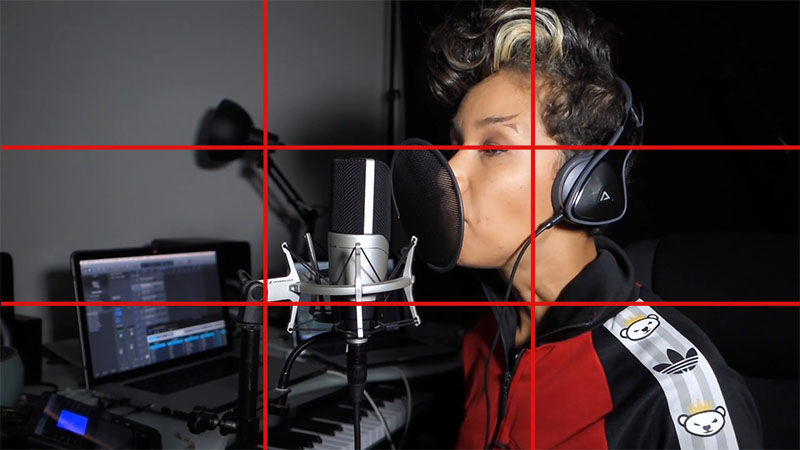
Composition: Composing a shot just means deciding where the subject is within the shot. You may have heard of the Rule of Thirds before in photography. The basic idea is that if you divide your video frame into thirds vertically and horizontally, you’ll get something that looks like a tic tac toe grid (see above). When composing your video, you want the subject (you) to sit along where the 4 points that these lines intersect. The top horizontal line should line up where the eyes are to help improve the composition as well. Using the Rule of Thirds is said to make the shot more balanced and interesting. This is not a hard rule that you have to follow but it’s a great start for composing your video. Our natural tendency is to have the subject right in the middle, which is fine too but maybe aim to have the eyes line up with the top horizontal line.
You can add a grid overlay for your Camera app to help with composing your shots. On your iPhone, go to ‘Settings’ and scroll down to select ‘Camera’. Under the ‘Composition’ section, turn on ‘Grid’. When you pop back into your camera app, you’ll see the white lines over your screen.
Backdrop: Tidy up the area behind you if you’re indoors. Make sure the background looks presentable and not distracting.
Lighting: Typically, you’ll just set up the light in front of the camera, which is fine. If you can implement some of the 3 point lighting setup techniques, even with just 2 light sources (key and fill), that would be more ideal. If shooting during the day, you can use the window as a second source of light in addition to something like a ring light. Be careful with shooting in a room with overhead lights directly below you or in front of you as it can create ugly shadows on your face, especially under your eyes.
Sound: Don’t forget to turn off any air filters, appliances, fans or anything that can be distracting. Make sure the room acoustics are good by adding things to absorb unwanted echoes and cover bare walls and non-carpeted floors.
Front or Back Camera? The camera on the back of your camera is likely to be better than the front facing one. The problem is you’re not going to be able to adjust your shot as easily without being able to see the screen unless you use the front facing camera. Do some test shots until you get it right or have someone help you. Otherwise, the front facing camera can work.
Test Shots: Be sure to do some test shots to see how it looks and sounds. If you have an external mic connected, you may have to unplug it to hear it playback on your phone speakers. If you’re doing a lip sync version and you want to play it off as it’s a live recording, make sure the right cables are plugged in and devices are on.
Get basic assistance: It’s possible you can do this all yourself. But if you have a friend or partner who can help out, even if they don’t know anything about video, you should see if they can give you a hand. This could be as simple as setting up the shot and pressing the record button.
5. Post-Production / Editing
Once you record the video, you may want to do some basic touch ups or clean up the footage like cut dead air at the beginning or end. Although I haven’t used it, YouTube allows you to make basic edits once you upload the video to their servers.
You can also download a video editing app to edit the footage on your smartphone. I personally use InShot, which is available for both iOs and Android. There is a free version you can use, but features and functions will be limited. If you upgrade to Pro, it costs $3.99 a month or $19.99 a year. You can also pay a one-time cost of $49.99, which is what I did.
6. Upload / Search Optimization
Once the cover song video is ready, the most likely place you’ll be uploading your cover song / video content is YouTube. Here’s some basic things you’ll want to optimize so your video is more likely to be discovered and watched.
YouTube Thumbnails – The most important element is the thumbnail because it’s what people notice first in search results. The idea is you want to attract people to click on your video. You can just use a frame in the video, but I recommend using a tool like Canva to add some text to make it stand out.
Video Title – Ideally, start with the name of the original artist and song title then your artist name. What appears first in the title is generally considered more important so you want the more popular artist to be listed first for search purposes.
Original Artist Name – Song Title (‘Your Artist Name’ Cover)
Video Description – Fill this out as much relevant information as you can. Include who the original song is by, lyrics to the song, your short bio, a link to your website and social media links. If you released the song on digital platforms, include a smart link for people to listen on their preferred service.
Tags – Tags are keywords to help YouTube understand what your video is about. Add all the proper and relevant keywords for your video. Don’t stuff random terms that are not related to the video. In order of importance, tags are at the bottom compared to the title, thumbnail and description so don’t spend too much time getting all the right tags.
Advanced Video Tactics
In this section, I just want to touch on a few ideas to take your cover song videos to the next level. It does require video editing software like Adobe Premiere or Apple’s Final Cut Pro or another person to help. Nothing here is too complicated though as there are plenty of video tutorials on YouTube that show you how to do these things with your video editing software of choice.
Green Screen
One way to make your cover songs a bit more dynamic is using a green screen in the background so you can.
Here’s an example where we used a green screen for Butterscotch’s cover of My Favorite Things. Butterscotch shot all the video footage and sent them to me to edit.
If you’re looking to buy one, I personally own and recommend is the Neewer Chromakey Backdrops, Double-Sided Green Screen and Blue Screen, 2-in-1 Collapsible and Reversible Background ($47). It does not come with a stand or something to hold it up so you’ll need to buy that separately.
If you want something more stationary, you can try the YAYOYA Green Screen Backdrop Kit with Stand 5×6.5 ft. ($43) or the Heysliy Green Screen Backdrop with Stand Kit for 5 X 6.5 ft. ($60).
Couple things you need to pay attention to when setting up your green screens are shadows and green screen reflections. Here are some tips to get the perfect green screen setup.
Gimbal – Video Stabilizer
For those who don’t know, a gimbal is a device that helps to stabilize your videos when you’re shooting. If you want to record a more dynamic cover song video and you have another hand to help, you may set up another angle using a gimbal.
The Zhiyun Smooth 4 Professional Gimbal Stabilizer ($100) is what I used for my iPhone 8 and now iPhone 12 mini. This does not work well with iPhone 11 and up so make sure whatever gimbal you go with that it actually fits your phone like the Zhiyun Smooth 5. This version comes with an attachable LED fill light.
Another mobile phone gimbal to consider is the DJI Osmo 3 ($99) or the DJI OM 4 ($150).
Some smartphones like the newer iPhones have built-in video stabilization so you may not need a gimbal.
Multiple Camera Setup
If you want to get a bit fancier, you might want to do a multiple camera setup with multiple smartphones or mobile devices.
This is more advanced so it’ll require post-production work to piece the videos together so I wouldn’t recommend it if you’re just starting out and you don’t have any experience with video editing. Depending on the type of music you do or play, I would say no more than 3 cameras.
Also, I highly recommend using the same exact device. So if you have an iPhone 12, make sure the other other cameras are at least iPhone 11 and not like an iPhone 6.
The reason is because each camera brand records and processes color a bit differently. There may be subtle differences in each shot. In the grand scheme of things, it’s a minor issue but I figure you should be aware of it.
Three-Point Lighting Setup
If you have the resources and time to learn some lighting basics, this can help elevate your video quality. Typically, our natural inclination is to place the light directly in front of us. For practical purposes, it’s fine. However, this isn’t ideal because it flattens the subject. What helps make a good quality video is strategically placing or manipulating lights to create depth and dimension for the subject to stand out.
There are tons of different free video tutorials you can watch. Here’s one of them:
Upgraded Video Capturing App
If you want to use a more advanced video capturing app, I personally use ProCam. One of the big reasons I use it is because it has a built image stabilizer to smooth out handheld shots. If you’re just doing still video on a tripod, this isn’t important but you can also customize a lot of other camera settings you can’t do on your iPhone.
Conclusion
Cover songs are one type of content that you should have in your arsenal. Everything covered in this blog should help you make better video quality with your smartphone. You can still make quality videos without using expensive cameras and equipment to elevate your music career.
Related Blog: How to Create Short Form Video Content to Gain New Fans As A Musician


Thanks a lot for this! I’ve been looking for how to make a quality acoustic cover, and I’m not experienced with the equipment enough to record into my PC while filming myself, and it stops me from doing anything at all. I have bought a mic I can attach to my smartphone and will start from there!